Well, following the things I bump into I now have a guide to install Roundcube (nice and cheap [see ‘free’] webmail) in a server with plesk 11, which happens to usually ignore apache’s vhost config whenever it likes so in here I try to explain how to install roundcube for all the domains in plesk, being able to log in without including @domain, etc. but installing it inside a subscription within plesk so, aside from avoiding stupid errors, it’ll be included in Plesk’s server backup should we need it some day.
This install was made in a centos 6 but it doesn’t have any distro-specific stuff so it should work for debian-based distros also and changing the roundcube configuration section the rest should work for any other webmail you wish to install in plesk.
There are a few guides around the internet but most of them either don’t work or overwrite some plesk’s webmail to put roundcube in its place, this way all of plesk’s webmails will remain intact and roundcube will be added as a new one.
Without further delay, let’s get to it…

Creating the subscription in Plesk
For a start we create a new subscription in Plesk for roundcube, we can set roundcube.local as domain name for example. It has to be a new subscription, it can’t be a new domain inside a previous subscription because it could cause problems afterwards.
For this we just go into the Subscriptions section and Add new subscription
Installing it inside a subscription means we won’t have to do any file editing outisde of plesk and as I told earlier it’ll be in the backup.
Configuring the database
(For advanced users, you can just create a database and a user and skip to the next step)
This can be done from the command line but it’s easier from Plesk. We have to create a new database for Roundcube.I Plesk we enter Tools & Settings (or Server, depending on the view)
In Applications and Databases we select Database Servers.
And then we click the open web admin icon for the local database server (It opens a popup window so check your popup blocker or deactivate it for this IP address)
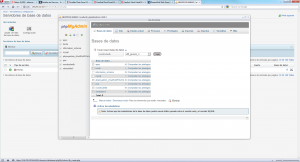
Once we’re inside phpMyAdmin we create a new database,for this we click in Databases.
And we create a new database with type utf8_general_ci (something like roundcubemail o roundcubedb).
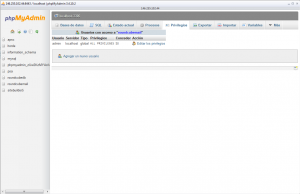
Once the database is created we refresh the page for it to show up (clicking databases again) and we get in Check privileges to add a new user.
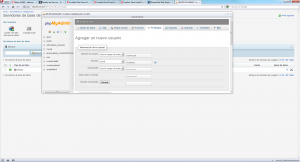
Create a new user with a name and password of your liking and the option: server local and just click Continue in the bottom right corner of the page as it is.
With this we have created Roundcube’s database. Now we have to install the webmail in our server.
Installing Roundcube in our server
To install roundcube we have to connect to our server with ssh and go to the folder of the subscription we created at the beggining
cd /var/www/vhosts/roundcube.local/httpdocs
Once inside the folder we download Roundcube from sourceforge (the link in the example is for the 0.8.1 version,you can check their webpage to look for a newer version)
wget http://downloads.sourceforge.net/project/roundcubemail/roundcubemail/0.8.1/roundcubemail-0.8.1.tar.gz
We untar the file we’ve just downloaded:
tar –xvzf roundcubemail-8.1.1.tar.gz
And move everything to the webpage’s root folder:
mv roundcubemail-8.1.1.tar.gz/* .
With this we have the files in place, now let’s change the configuration, for that go to the config folder
cd config
And copy the config files from the templates with these two commands:
cp db.inc.php.dist db.inc.php
cp main.inc.php.dist main.inc.php
Now we have to change the database access config, we do this by editing the db.inc.php file with any text editor (I’m using vi)
vi db.inc.php
We edit the rcmail_config[‘db_dsnw’] line and put the database we created before, changing the elements in <> with our own database’s:
$rcmail_config['db_dsnw'] = 'mysql://<usuario>:<contraseña>@localhost/<base de datos>';
Now we change the main.inc.php file, again with any text editor:
vi main.inc.php
Now most of these are optional steps but they give a nice set of funcionalities, you have to make the changes in the main.inc.php file:
Logging in without selecting the server each time
$rcmail_config['default_host'] = ‘mail.%d’;
or your mail server if it’s different from mail.domain.tld
Forcing the creation of trash, sent,… folders
$rcmail_config['create_default_folders'] = true;
Make roundcube create html emails
We have a choice here,0 never create html mail, 1 always do it, 2 only when replying to mails in html.
$rcmail_config['htmleditor'] = 1;
Avoiding the need for @domain.tld in the username
$rcmail_config['username_domain'] = '%d'
Allow the password change from within the webmail
First we have to create the plugin file, so from the httpdocs folder:
cd /var/www/vhosts/roundcube.local/httpdocs
cp plugins/password/config.inc.php.dist plugins/password/config.inc.php
Now we edit the file (as always the use of vi is a matter of choice)
vi plugins/password/config.inc.php
And we have to change the “password driver” line to use poppassd instead of sql
$rcmail_config['password_driver'] = 'poppassd'
To activate the plugin we have to once more edit the main.inc.php file
vi config/main.inc.php
And in the plugins section add the “password” plugin so the entry looks like this:
$rcmail_config['plugins'] = array('password');
Initial database loading
For Roundcube to work correctlywe have to load an initial sql file into the database, it can be found in the SQL folders and it’s name is mysql.initial.sql.
We can use the web admin and the import option inside the database or we can do it from the command line executing (chage the values in quotes for the database user and name for the one we created before), from httpdocs folder:
mysql -u “usuario” -p “base de datos” < SQL/mysql.initial.sql
It’ll ask for a password, it’s the one we chose when creating the user.
Modifying vhosts for use with all the domains in plesk
To be able to use the webmail with all the domains we have in the server we must modify the vhost.conf file in its domain for it to capture all the accesses using a specific subdomain (webmail, roundcube, rc,…)
To do this we have to modify the following file:
vi /var/www/vhosts/roundcube.local/conf/vhost.conf
and add the following entries (read the next paragraph first, the entries depend on what we want):
ServerName roundcube.webmail
ServerAlias roundcube.webmail.*
ServerAlias webmail.*
ServerAlias roundcube.*
Here we have some options. The webmail subdomain will keep pointing to horde unless we change that option in plesk (we’ll see that in a while). But we can use any other ServerAlias and have different webmails working in the same domain,like webmail.domain.tld pointing to horde, roundcube.domain.tld pointing to roundcube, etc. The idea here is ServerAlias subdomain.* (the .* is for it to answer on every domain). If the subdomain is not otherwise configured inside the domain (it needs an A entry in the DNS pointing to the server’s IP) it’ll go to the webmail.
Special emphasis on creating the subdomain as an A entry in the DNS server pointing to the IP, not as a plesk subdomain or anything else, just a DNS entry.
With the config from the example roundcube would answer to webmail.domain, roundcube.domainy roundcube.webmail.domain (after proper plesk configuration).
Changes in Plesk
Now we have two options, using a different subdomain (not webamil) forroundcube and leave plesk’s webmail (horde by default using webmail.domain) or configuring roundcube as a webmail inside pleskand use webmail.domain.
Using a different subdomain
If you want to use roundcube with a subdomain other than webmail you only need the vhost.conf configuration (donde before) and adding an A entry to the DNS server pointing to your IP.
Using ‘webmail’ subdomain
Here we have to add Roundcube as a webmail option in Plesk. The first thing we need is for our server to solve the false domain we created for roundcube, so we have to modify the hosts file:
vi /etc/hosts
and add
<IP> roundcube.local
with the server IP and the domain name we used when creating the subscription, this way Plesk’ll solve the domain to the right address (I suppose using 127.0.0.1 or localhost could work but I used the external IP address just in case Plesk gets cute).
Now inside Plesk panel go to Tools and Settings and into webmail in the Mail section.
Once in there go to Register Webmail give a name to the server, like “RoundCube” and the full address for the service, in this case http://roundcube.local,the one we used in the hosts file.
Accept and Roundcube will be a webmail option in Plesk.
Now we can go to any domain and in the mail section configure RoundCube as webmail.
Unfortunately Plek’s support for third-party webmail isn’t complete so this stops the webmail from redirecting to horde but it desn’t make it redirect to Roundcube so we have to manually create the webmail entry in the DNS as if we were using another subdomain. With any luck a future MU will fix this and Plesk will create the redirect.
Last steps and testing
To finish everything you have to make Plesk reconfigure the domain and restart the web server. To do it execute the following command using the domain name you selected for roundcube.
/usr/local/psa/admin/bin/httpdmng --reconfigure-domain roundcube.local
or just make it reconfigure all the domains with:
/usr/local/psa/admin/bin/httpdmng --reconfigure-all
And now it should be all working in whatever subdomain you chose and with whatever config options you chose.


Thank you for your great tutorial. Works like a charm.
Thank you so much!
Great article, please let me know if you have more of these nice articles!
Luc de Jager
Thank you!!!!! This is great been looking for 2 days….
Hello, i follow this guide exactly but im not getting the images just letters and white background on the roundcube login page, do i missing something?